

- remove_red_eye 351
- favorite 0
How to make an arm-knit blanket step by step — without knitting needles or a crochet hook.
- today
- perm_identity Agnieszka Dąbrowska
- label Practical Tips
- description You will read in 7 mins.
How to make an arm-knit blanket step by step — without knitting needles or a crochet hook
You make an arm-knit blanket in six steps: arrange the first row of loops to match the width of the blanket, work the next rows with your fingers while keeping even tension and making loops no wider than three fingers, check the width every few rows, join new skeins at the ends of rows, bind off the last row by pulling the loops through one another, and weave in the ends. You only need yarn — for an 80×100 cm blanket, 3–4 skeins of chenille. For a beginner, the whole project takes 3–4 hours, so about one evening.
Arm knitting (finger knitting) is the simplest technique for making blankets: your hands are the only tools, and chunky yarn makes the project grow so quickly that you can see the progress right away. If you have never made anything with yarn before — this is exactly the project worth starting with.
Step 0. Prepare the materials
You need yarn and scissors — no knitting needles, crochet hook, or sewing machine. Choose yarn with a strand around 2 cm thick and approximately 25 m per 230 g skein: the most popular choice is chenille (over 90 color options) — 37.99 zł per 230 g skein, around 34 zł when on sale. Chenille is forgiving: you can unravel and redo it without leaving marks. Amounts: an 80×100 cm blanket requires 3–4 skeins (around 115–150 zł), a 100×120 cm blanket — 5–6 skeins, and a large 120×180 cm blanket — 9–10 skeins. Always buy one extra skein from the same dye lot. If you prefer not to calculate the amount yourself, a DIY kit includes a measured amount of yarn and instructions (full yarn comparison: "Which yarn is best for a blanket?").
Instructions: arm-knit blanket in 6 steps
1. Make the starting loop and use your fingers to arrange the first row of loops to match the desired width of the blanket (for an 80 cm blanket — usually 14–16 loops, depending on the thickness of the yarn). Do not tighten the loops too much: your hand holding the yarn should pass through each one easily.
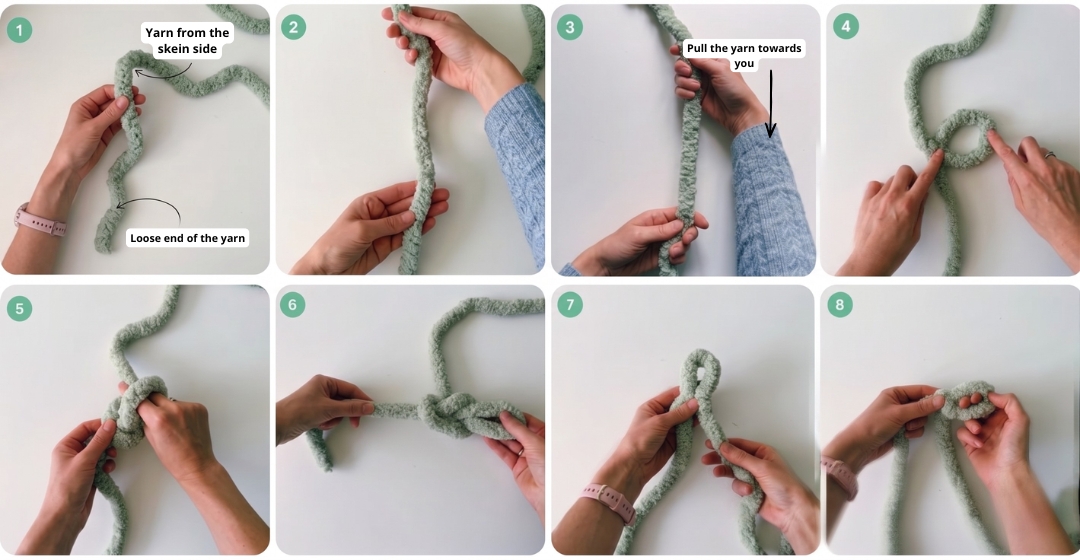
.png)
2. Work the second row: pull a loop of working yarn through each loop from the previous row, always in the same direction. Follow the small-loop rule — no wider than three fingers. Larger loops look loose and will stretch after the first wash under the weight of the water.
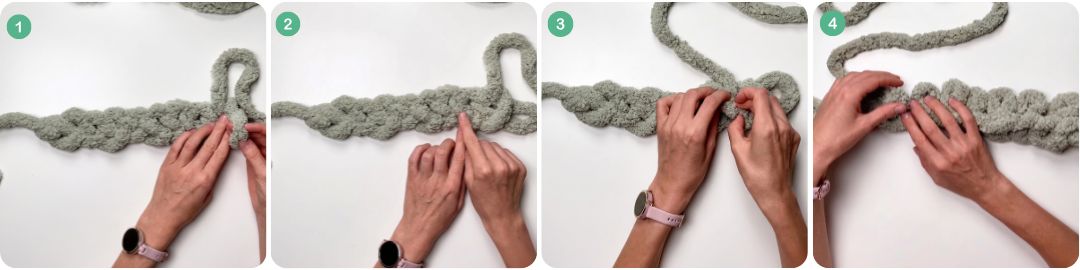
3. Check the width every 3–4 rows: count the loops and compare the work with the first row. If the blanket starts getting narrower, it means you are pulling the yarn tighter with each row — this is normal when your hands get tired, so simply relax your grip.
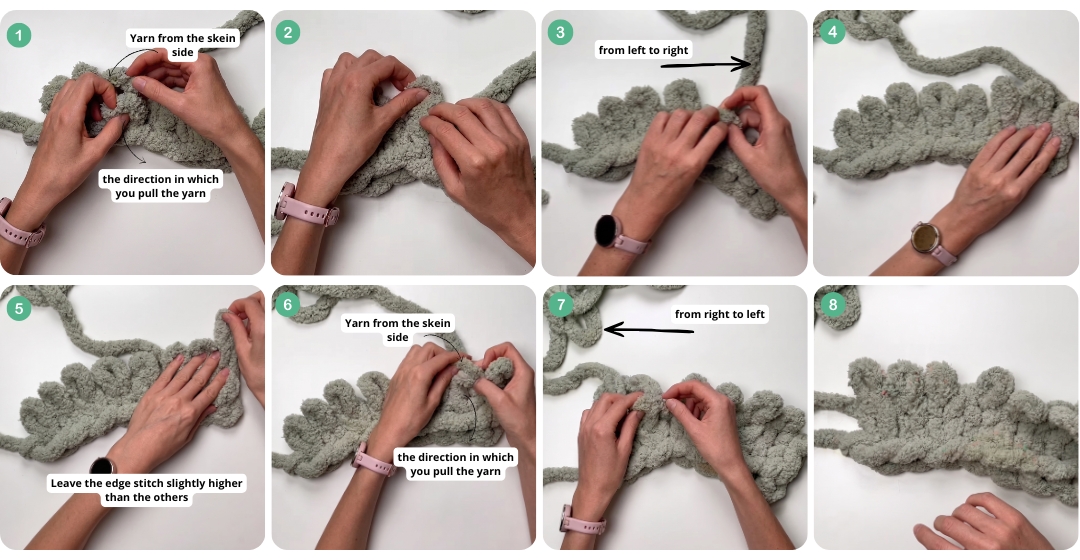
4. Join new skeins at the end of a row, not in the middle: leave around 15 cm of yarn from both the old and the new skein, continue with the new yarn, and weave the ends into the loops later. In fluffy chenille, the join disappears completely.
5. Bind off the last row: pull the first loop through the second, the second through the third, and continue in the same way to the end of the row; tie off the last loop and hide the yarn end in the weave.
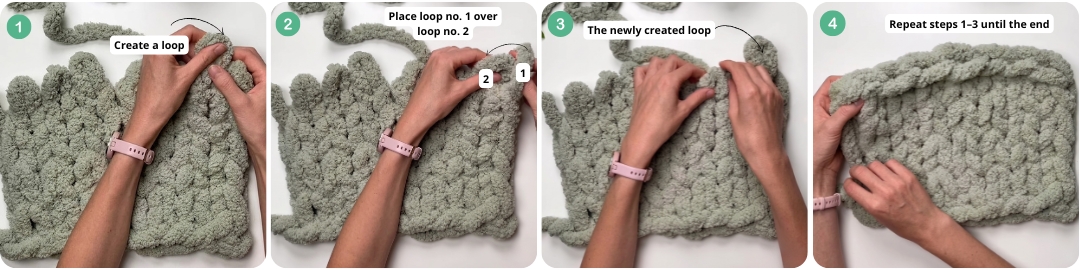
6. Finish: weave in all the yarn ends with a needle or your fingers along the weave, lay the blanket flat, and gently "comb" the loops with your hand to even out the texture. Done.
The most common mistakes (and quick fixes)
Three things most often spoil a first blanket: uneven tension (solution: take a break every 20 minutes and check the width), loops that are too large (solution: follow the three-finger rule), and stopping work while the loops are left open (solution: thread a ribbon through the loops before leaving the blanket). We describe other common mistakes and how to fix them in the article "The most common mistakes when arm knitting a blanket" — and the rules for washing a finished blanket in our care guide.
Would you rather watch than read?
Arm knitting is easier to show than to explain. The online blanket arm-knitting course (basic module around 149 zł) shows in video exactly the moments when mistakes usually happen: the first row, the weaving pace, joining skeins, and binding off. The advanced module and "master stitches" teach decorative patterns, such as braids. And if you prefer learning in person — 3-hour workshops are held in Warsaw, and you leave with a finished blanket.
FAQ: arm-knit blanket
Summary
Six steps, one evening, no knitting needles or crochet hook — an arm-knit blanket is one of the most rewarding first craft projects because the chunky texture creates the effect by itself. Order your skeins (plus one extra), set aside an evening, and remember the three-finger rule. The rest will come naturally — by the third row at the latest.


